This is a convenient graphical representation
of the transformation equations for plane stress. Rewriting equation (A) and
(B) with all terms containing  on one side
of the equation
on one side
of the equation

equation (A) square both sides

equation (B) square both sides

This equation is of the form:

which is the equation of a circle (x2+y2
= r2) with x-axis as  y-axis as
  ,
radius as r and center of circle at (a, b).
,
radius as r and center of circle at (a, b).

Hence with the values of center of circle (a, b)
and radius (r) known, the plane stress equations can now be represented by the
Mohr’s circle.
Note: There are many ways to construct a circle, namely; center-radius, 3 points
on the circumference, 2 points which are diametrically opposite etc.. We shall
use the 2 points technique because it does not involve memorising of equations.

Fig. 2.8
Steps to construct a Mohr’s circle
- Locate point A.
 is known and is +ve (tensile).
  is known
and is -ve, because
is known
and is -ve, because  the shear stress
on the surface acts is a CCW couople.
the shear stress
on the surface acts is a CCW couople.
- Locate point B.
 is known and is +ve (tensile).
  is known
and is +ve, because
is known
and is +ve, because  forms a CW couple.
- Join A and B. The line intersects the
 axis at C. This is the center of the circle.
- Draw the Mohr’s circle with center at C,
using radius AC or BC.
- Note the following convention.
Normal stress: +ve (tensile); -ve (compressive)
Shear stress : 
Data obtained from a Mohr’s circle
- Principal normal stresses
 and
and  (equation (D)).
Since the shear stress=0 when  and
and  occurs. Therefore
  and
and  must
be at the points where
must
be at the points where  axis cuts the
Mohr's circle.
axis cuts the
Mohr's circle.
- The angle(
 )
where
)
where  and
and  occurs (equation (C)).
This is half the angle measured from AC to the  axis.
axis.
- Principal shear stress
 and
and  or
or  (equation (F)).
- From the Mohr’s circle,
 and
and  are the maximum shear stress. The
corresponding occurs at point C which gives
are the maximum shear stress. The
corresponding occurs at point C which gives  (equation (G)).
- The angle
 ,
where,
,
where,  occurs (equation (E))
This is half the angle measured from AC to the line joining  .
.
Example 2
Repeat example 1 by using Mohr’s circle.


Fig. 2.9

Graphical accuracy, in general, is sufficient.
However, more accurate result, if desired, can be obtained using simple geometry
functions, with one example shown above.
Example 3
Given the state of stress shown in the Fig.2.10, locate the principal normal and
shear stress and the associated normal stress. Show the results on properly
oriented elements.


Fig. 2.10
Note that orientation of the elements can be
easily drawn by using point D which is opposite side of the  axis of point A.
Projection of the  ,
,  ,
,

 points through D would yield the surface which the respective stress acts.
Example 4
Using Mohr' s circle, transform the stresses shown in the figure into stresses
acting on the plane at an angle of  with the
vertical axis.
with the
vertical axis.


Fig. 2.11
Example 5
The figure below shows a shaft and pulley system subjected to a 1kN load.
Determine the stress in Ř 25mm section.
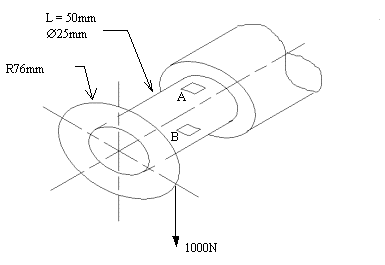
Fig. 2.12
The shaft is subjected to torsion, bending and
shear.
For Torsion
Maximum torsional stress occurs at the surface.
Using:

For Bending
Maximum BM occur at point A or B (cantilever).
MA = 1000 x 0.05
= 50 Nm
 |
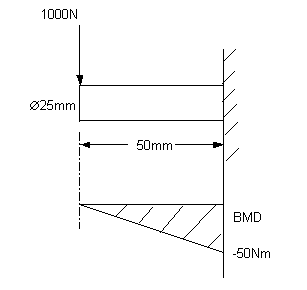 |
The shear stresses at the surface of the shaft = 0, based on shear flow theory.
Hence the element A has the following stresses:

Construct the Mohr’s circle:

Fig. 2.13
Therefore the highest normal stress solution is
shown in Fig 2.13(i) and highest shear stress in Fig2.13(ii).
A similar solution for element B can be obtained but with the normal stress in
compressive mode.
Let us now compare the significance of using plane stress solution compared to
the conventional "one stress at a time" approach:
| |
Conventional approach |
Plane stress approach |
increase |
 |
24.77 MPa |
29.65 MPa |
19.7% |
 |
32.59 MPa |
 |
41%
 |
It is obvious that conventional approach in
combined stress analysis is clearly inadequate.The actual tensile stress
existing in element A (or on the shaft surface) has been "increase" by
41% and the shear stress by ~ 20% as compared to result obtained from
conventional calculation.
Failure of the Ř 25mm shaft will have the following characteristic:
Previous
Back
Next

