As explained earlier, there can be numerous
configurations of rosettes arrangement and each case yields different solution
of  .
.
Hence, it will be ideal to have a technique which can solve for the principal
strains without having to obtain  and is applicable to a generic rosette arrangement.
This can be achieved by the technique
developed for Mohrís circle for strain rosettes.


Mohrís circle construction for strain
rosette.
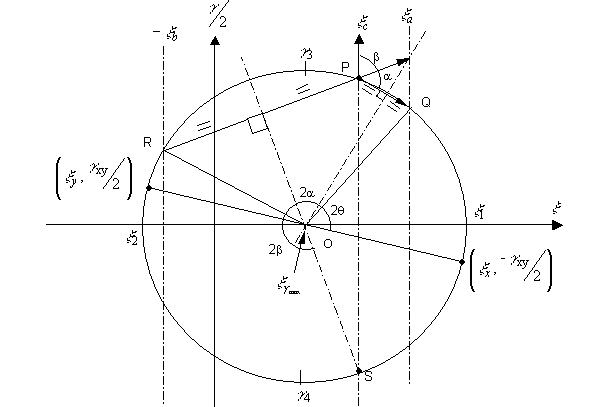
Steps to construct a Mohrís circle
for strain rosette
- Set up the vertical axis to represent
 = 0 which is also the
  axis.
axis.
- Draw 3 parallel lines to the
 axis at the appropriate distances representing the values (+ve or -ve) of
  and
and  .
.
- On the middle line of these three (which is
the
 line for this case), mark a point P representing the origin of the rosette.
- Draw the rosette configuration at point P
with gauge C (for this case) in line with the
 line at Q and R.
- Construct perpendicular bisectors of PQ and
PR. Where these intersect is the center of the strain Mohrís circle, O.
- Draw the circle on this center, which of
course should pass through points P, Q and R. Insert the x-axis passing
through O and this is the
 axis.
axis.
- Join O to Q, R and S; where S is the
opposite point of P on the circle.
- Lines OQ, OR and OS represents the 3 gauges
on the circle where 2
 and 2
and 2 are the angles between the gauges.
- From the circle, read off the required
strain values e.g.
 .
.
 can also be found by considering the appropriate angle
(
 )
from gauge a.
Example 8
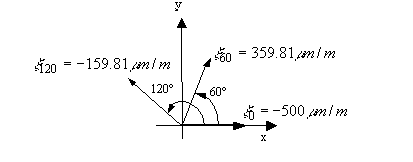
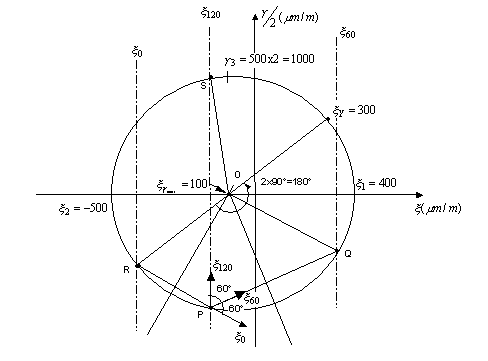
Using Example 7, solve using Mohr's circle for strain rosette
Solution:


Notice that:
 which is the same as that obtained using equations in example 7.
- Principal strain solution are the same as
Mohrís circle solution using
 values as shown in Example 6.
Hence, this construction technique of
Mohrís circle for strain rosettes is a very powerful technique in obtaining
principal strains without the constraint of using equations for each case of
rosettes configuration.
Previous
Back
![]() .
.![]() and is applicable to a generic rosette arrangement.
and is applicable to a generic rosette arrangement.


